Setting-up my development system
by Sebastien Mirolo on Fri, 15 May 2009Introduction
I decided to replace my venerable PowerBook G4 by a new Intel MacBook as my primary development machine. I've done the switch mainly because the code I write gets deployed on a variety of target platforms I do not currently have access to. With an Intel Mac, I can install other operating systems along side OSX. That way, I can keep OSX a my primary platform while switching to Ubuntu, Fedora and Windows/Cygwin for testing my code before it gets deployed.
With OSX 10.5, I can also upgrade some of the tools I use everyday that are slowly being deprecated for a PowerPC / OSX 10.4 platform. Among the new features, I kind of like: Terminal.app tab windows, Terminal.app persistent window state and Mail.app RSS subscription.
I take my laptop pretty much everywhere I go, working from Coffee shop all around the San Francisco area. I've never plugged my PowerBook to a monitor nor feel the need for it. Size, weight and battery life remain the most important criteria for me. I thus settled on a standard MacBook 13'' with an additional 2Gb of RAM (for a total 4Gb). The form factor is close to my previous PowerBook though a little wider. As a result, I haven't been able to reuse my case, a nice leather enclosure around a Letter notepad from Office Depot reconverted as a laptop case. I was a little worried about this until I found a larger notepad enclosure fitting the MacBook. It is a nice black leather enclosure, just a little bit much bulky with the inside pockets.
There are a few shortcuts that are useful when configuring an OSX system. Command-Shift-4, followed by space, then clicking a window. This takes a screenshot of a window and save it as a file on the desktop. Pressing Command-Option-O-F at boot time will get you into the Open Firmware. Other OS X keyboard shortcuts can also be useful later on.
Data Recovery Strategy
Before spending too much time installing the new machine, it is a good idea to plan for recovery - just in case.
The internal harddrive is 250Gb and I bought an external Western Digital 250Gb usb drive to match it. The usb drive is usb powered, an important feature when traveling between the United States and Europe. When I plugged the drive into the front-most usb connector on the PowerBook, the drive never showed into the Finder, even if the usb drive sounds like it starts spinning. The drive worked fine when plugged in the back-most connector. Replacing the provided cable by a longer one and my Linux server reported intermittent errors. Both experiences make me think that the power requirements for the usb drive are very close to the edge.
I split the internal 250Gb drive between two partitions: 100Gb for the system and 150 Gb for personal data. The /Users folder is mounted on that partition. The system can always be reinstalled from the DVD. The system partition can be wiped out and a more recent system installed without disturbing personal datas.
I first thought about dual booting my MacBook with OSX and Linux. In order to share the home partition between OSX and Linux, it needs to be mounted with a filesystem that both systems can manage. FAT is the only filesystem than can reliably mounted on Windows, OSX and Linux. The issue though is that FAT does not handle permission and file ownership. By default, OSX uses a journaled version of HFS+ labeled "Mac OSX Extended" by the disk utility. At this time, Linux cannot mount journaled HFS+ in read/write mode but fully handles regular HFS+ as far as I can tell. Even if I settled on using VMware instead of dual booting, I formatted the Home partition as "Mac OSX Extended" and mount it as /Users. The plan is to duplicate the whole Home partition with dd onto the usb drive, either directly or as a file. I could then later mount it on a Linux machine if necessary.
Initially, I thought I could just resize the one partition that comes preconfigured with the MacBook. Doing so locked up Disk Utility with no indication of what was going on so I had to start from scratch and use the OSX Install DVD. I inserted OSX Install DVD, power up and hold down the 'C' key to boot from the DVD drive. On a side note, you can enable debug (i.e. console) mode by holding down command-v after the boot chime..
I started Disk Utility (MacOSX Installer >Utilities >Disk Utility), selected the internal harddrive (232.9 GB FUJITSU MHZ22250BH FFS G1 Media), and click the "Partition" tab. I created two partitions, the first one labeled "Macintosh HD ", formatted using "Mac OS Extended (Journaled)" of size 100.38 Gb and the second one labeled "Home", formatted using "MacOS Extended Size" of size 132.51Gb.
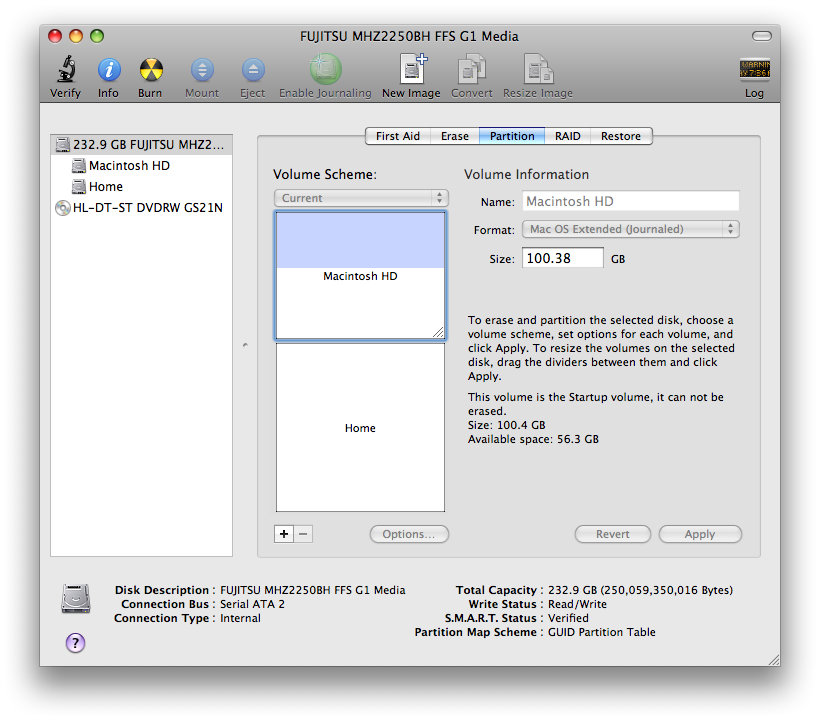
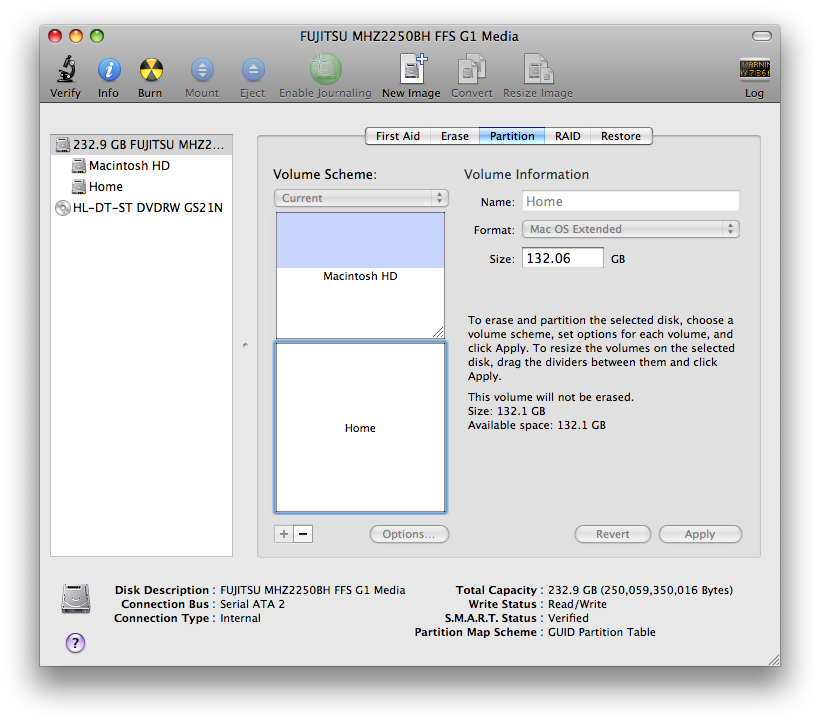
Finally I installed the OSX system through the installer onto the "Machintosh HD" partition. This takes about 11Gb. To mount the Home partition as /Users, I've updated /etc/fstab.
LABEL=Home /Users hfs rw 0 1
As a result, the home partition does not not appear in /Volumes anymore. The actual name of the Home partition can be found through System Profiler >Serial-ATA >BSD Name. I tried to duplicate the whole partition on my usb drive with dd. Unfortunately the command fails with a "resource busy" message. I am not sure why or how to figure this one out.
[host]$ sudo time dd if=/dev/disk0s3 of=/Volumes/WD250/macBookHome.dmg
I thus decided to rely on rsync to replicate my home partition.
[host]$ time rsync -auvRh --delete --exclude=Library/Caches/ --exclude=build/ --exclude='*~' /Users/./username /Volumes/Replicate/Users
The time it takes to keep the replicate copy in sync with the internal harddrive after the initial replication is very important to me so a carefully crafted rsync command might be the best compromise in the end. The risk of "forgetting" something is low because I have a deep knowledge of the layout of my /Users folder. The applications that ship with OSX, like iTunes, are nice but they have a tendency to want to move, copy and alterate your personal files organization in many ways. I recommend to understand and disable the features that mess around with your personal files if you either care enough about using those applications.
Access Control
Physical Access
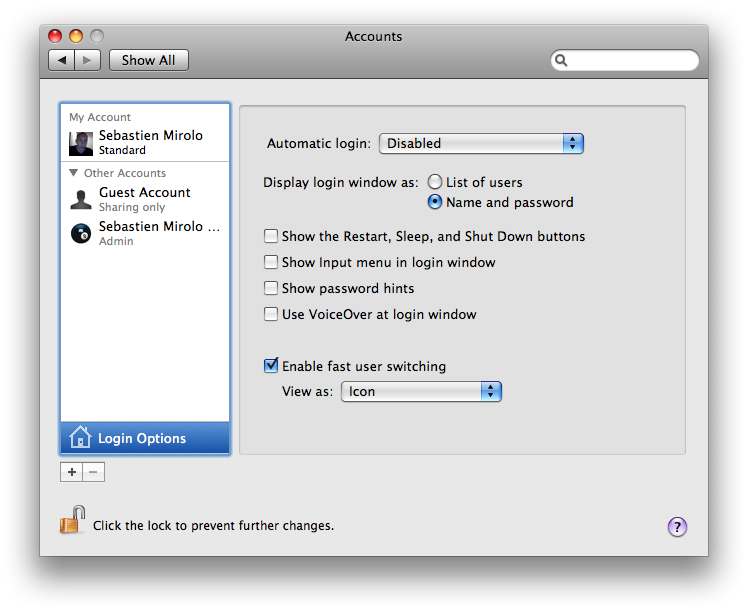
Even if chances are very slim the MacBook will get out of my sight, I carry it around everywhere and unauthorized physical access is an important concern. Two basic options that need to be set right away are "Disable automatic login" and "Require password to wake this computer up".Those two options can be found through System Preferences > Accounts > Login Options and System Preferences > Security > General respectively.
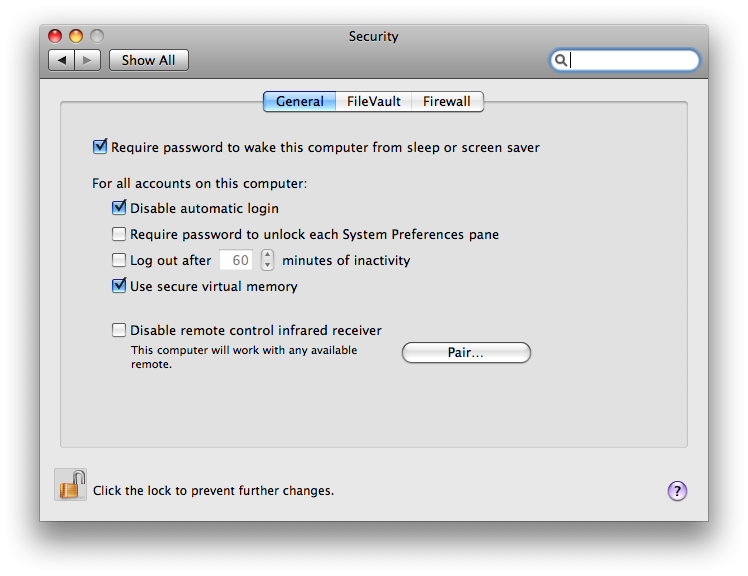
Other options I unchecked are "Show the restart, Sleep and shutdown buttons" and "Show password hint". I also set "Display login window as" to "Name and password".
A locked login window prevents someone to quickly start browsing around personal data. With more time, an intruder can always boot the machine with another operating system and access the files directly on the disk. The only way to prevent against this attack is to use disk level encryption. As most applications might leak data out of an encrypted partition, through temporary files for example, the only safe option is to use whole disk encryption.
Compilation puts a lot of pressure of the harddrive and most files I hold are not considered highly sensitive. My trade-off was thus to create an encrypted disk image to store account credentials for the numerous websites I have access to. There are little chances that editing text files with vi will result in my accounts leaking.
Personal data important enough to be encrypted is surely important enough to be part of any data recovery plan. I thus investigated how encrypted OSX images could be mounted on Linux. Mounting OSX images formatted with an HFS+ file system is no problem on Linux. It can be done with the following command.
[host]$ sudo mount -t hfsplus -o loop image.dmg /media/disk
I couldn't get an encrypted HFS+ image to mount properly on Linux though. The first step was to make sure I could create and mount an encrypted file as a loopback device on Linux. To do that, the cryptoloop module needs to be imported in the kernel through the following command.
[host]$ sudo modprobe cryptoloop
Once all the necessary modules are imported in the kernel, the following command should work. Unfortunately it fails misserably.
[host]$ sudo mount -t hfsplus -o loop,encryption=aes,keybits=128 image.dmg /media/disk
I tried to format the image using different boot block but with no success. The mount command invariably fails and dmesg indicates the root block is incorrect.
None-the-less I created a cdrom-sized aes128 encrypted disk image. The idea of using a cdrom-sized disk image is to be able to archived sensitive data on a timely basis on a CD disc.
Remote Access
The default account has been created with admin privileges. It does not make much sense to have so much access for daily work so I created a special admin account named _username and marked my original account as "Standard".
I have no reason to access my MacBook remotely so I checked all ports are closed by the OSX Firewall. I also enabled "Enable Stealth Model" to avoid sending a reply the computer even exists.
A local Network in a box
I've been interested to install Windows and Linux along side OSX on the MacBook in order to be able to test my code under those systems. After considering triple booting, I decided to install VMware Fusion instead. It is possible to create a complete network of virtual machines all in one laptop. As it turns out, Ubuntu and Fedora are different enough in ways that affect my code I decided to create the network with three machines. I now have a virtual machine that runs Ubuntu, one that runs Fedora and one that runs Windows.
As an alternative to VMware, it might be worth looking at virtualBox. After setting up VMware, I downloaded VirtualBox-2.2.0-45846-OSX.dmg and tried it on another MacBook. The interface looks very similar to VMware. The first virtual machine I tried to setup failed, no error message. virtualBox just stopped. With VMware running, I don't really want to investigate further, maybe another time.
Most of my work is done by editing files in Carbon Emacs. To use the virtual machines for testing, I only need to be able to ssh into the guest from the host and get my home folder on the host mounted on the guest. I decided to save all the virtual machines on the system partition into a folder called "/Library/Virtual Machines" instead of ~/Documents, the default folder proposed by VMware. This prevents my personal data to be clobbered with huge files that do not have much value to me.
I downloaded VMWare-Fusion-2.0.4-159196-light.dmg from the VMware website. MacFUSE 1.5.1 can also be installed alongside VMware Fusion. This feature enables Finder to mount a VMware Fusion virtual disk and view its content when the virtual machine is powered off.
In NAT mode, VMware acts as a router to the whole virtual network. There is no more valuable information on one machine or the other so I am using the same username and password on each guest.
Create virtual machines
To create a Virtual Machine, it is as simple as going through the menus VMware Fusion>File>New and following the on screen instruction. I am still confused on how the DVD drive is acquired. Sometimes it works as expected. Sometimes VMware seems frozen. In that case, through Settings >CD/DVD, uncheck "Connected" usually does the trick and things start moving forward again. I uncheck the "Always open this virtual machine when VMware starts" as I have three machines and never know which one I need at any specific time.
The first important thing to check is to enable the host home folder be accessible to the guest. I rename the shared folder from "username on My Mac" to "username". The default name is just no good. It also complicates life and scripting seriously when spaces are present in file names. It is simple enough to switch between allowing read/write and read-only access to a shared folder so I will disable write permission by default.
The second important thing is to install "VMware Tools" if those don't get setup as part of the initial installation. From the menu Virtual Machine>Install VMware Tools, it will mount a disk image on the guest system. Extract the package on that disk into a working directory and run the vmware-install.pl script.
[host]$ cd /tmp
[host]$ tar zxvf /mnt/cdrom1/VMwareTools-7.9.3-159196.tar.gz
[host]$ cd vmware-tools-distrib
[host]$ sudo ./vmware-install.pl
Once this is done, the host home folder should be mounted at /mnt/hgfs/username.
Configuring the virtual network
VMware provides two virtual network interfaces vmnet1 and vmnet8. I am interested in the second one which is the NAT one. On vmnet8, VMware provides a DHCP server for the virtual machines. The DHCP server can be configured by editing the file /Library/Application Support/VMware Fusion/vmnet8/dhcpd.conf. /Library/Application Support/VMware Fusion/locations contains paths to different files used by VMware. For example, I figured out that the DHCP lease file is /var/db/vmware/vmnet-dhcpd-vmnet8.leases on my machine. The lease file is one place to look at when something goes wrong.
After modification to /Library/Application Support/VMware Fusion/vmnet8/dhcpd.conf, the VMware daemon needs to be restarted. It took me a while to realize how important the following command is. The virtual machine wouldn't connect to the network after a reboot of the macBook. By running the script on an interactive command line, any errors will be displayed on stdout.
[host]$ sudo "/Library/Application Support/VMware Fusion/boot.sh" --restart
Launching OSX DNS Daemon
At first, I tried to configure the VMware DHCP server with dynamic DNS updates. In order to do that, I decided to start bind, the DNS server that comes with OSX.
It took me some time to go through the articles about the history of OSX but I finally found out the process that starts daemons on OSX 10.5. It is launchd. OSX ships with bind and to start it at boot time, I replaced one line in /System/Library/LaunchDaemons/org.isc.named.plist.
-<key>Disabled</key>
+<key>OnDemand</key>
The DNS server can be configured by editing /etc/named.conf and then restarting the daemon with the following commands
[host]$ sudo lauchctl stop org.isc.named
[host]$ sudo launchctl start org.isc.named
After editing /etc/named.conf following documentation on bind, I tried for a few hours to add a record in my local DNS through different arrangements of command flags and commands to nsupdate. It reliably failed either one of the following error messages
; TSIG error with server: tsig indicates error
update failed: NOTAUTH(BADSIG)
; Communication with server failed: operation canceled
The following code works and ends up adding an entry to the /var/named/localdomain.zone file.
[host]$ sudo nsupdate -d -v -y rndc-key:key-value
> server 127.0.0.1
> update add queixada.localdomain 600 a 192.168.124.140
> send
nslookup or dig can be used to check the hostname to IP address mapping.
DHCP and Dynamic DNS Updates
Through a search on DHCP and dynamic DNS updates, I've found two useful sources of information on configuring DHCP with Dynamic DNS updates: here and debian administration.
Static IPs through DHCP
After long hours of trials and errors, I've not been able to setup dynamic DNS updates correctly. The fact that I cannot figure out logs that would indicate why it is failing either is a little frustrating.
As second best, I thus decided to assign static IPs through the VMware DHCP server.
I searched for the MAC addresses VMware Fusion associated with each of the virtual machines by issuing the command.
[host]$ find /Library/Virtual\ Machines -name '*.vmx' -exec grep -H 'ethernet0.generatedAddress ' {} \;
Then, I appended the following text to the end of the file "/Library/Application Support/VMware Fusion/vmnet8/dhcpd.conf".
host armada {
    hardware ethernet 00:0c:29:ba:c7:d6;
    fixed-address 192.168.124.10;
    option host-name "armada";
}

host queixada {
    hardware ethernet 00:0c:29:f7:fe:e0
    fixed-address 192.168.124.11;
    option host-name "queixada";
}

host mealua {
    hardware ethernet 00:0c:29:27:88:c4
    fixed-address 192.168.124.12;
    option host-name "mealua";
}
Remote login into the virtual machines
Since I setup each virtual machine with a fixed IP address, I do not really need an hostname to ssh into them from the host anymore. It might be convenient but not necessary.
One of the most interesting feature would actually be to start the virtual machine before connecting to it if the machine was not yet running. To do that, first VMware Fusion needs to be enabled headless mode
defaults write com.vmware.fusion fluxCapacitor -bool YES
The following command line can then start the virtual machine.
[host]$ /Library/Application\ Support/VMware\ Fusion/vmrun start /Library/Virtual\ Machines/Fedora.vmwarevm nogui
I decided to create a python script that does just that. I stopped my attempted to setup the OSX DNS to point to my virtual machines and hard coded the hostname to IP address mapping directly in the script. I've also put a line of Apple Script to change the background color of the terminal when I login into a virtual machine.
[host]$ osascript -e "tell application \"Terminal\" to set background color of window 1 to '{3598,29041,42662,0}'"
Guest specific notes
I've installed my virtual network with the following machine and VMware settings. On each machine I started sshd in order to be able to login into them from the host and thus using a single terminal application.
Note that there is seem to be a bug related to VMware with regards to linux and printer daemon. You might see "CUPS config timestamp change detected but old config retrieved via interface!" messages popping up on your console. Since I do not need to print from the virtual machines, I just removed cups alltogether from the systems. For example:
apt-get purge '^cups'
In order to share the host home folder mounted in a virtual machine (/mnt/hgfs/username), I still need to match the uid and gid for my account on each guest to reflect the uid and gid on the OSX host. I did that by first lookin up my OSX uid with:
[host]$ ls -n
Then I simply edited the /etc/passwd on Fedora and Ubuntu guest and updated file ownership accordingly.
[host]$ chown -R username /home/username
For Fedora, it worked well since the root account is enabled. For Ubuntu, after editing /etc/passwd, the os keeps complaining uid 1000 is not in /etc/passwd anymore - of course. To be able to change file permissions, I thus had to exit and log back in first. Now, logged back in with my new uid, everything worked fine.
| Ubuntu 9.04 | Fedora 10 | Vista | |
|---|---|---|---|
| hostname | queixada | armada | mealua |
| distribution | Desktop amd64 CD | x86_64 DVD | Ultimate with Service Pack 1 (x86) |
| VMware Settings | Ubuntu | Other Linux 2.6.x kernel 64-bit. | Windows Vista x64 |
Ubuntu 9.04 specific notes
VMware will use the OSX user profile to setup the initial account. Ubuntu 8.10 install is straightforward. Ubuntu 9.04 is still recent and breaks while installing the vmhgfs module. VMware Tools fail to install with no error message of any kind. Hopefully there is already a workaround published.
Fedora 10 specific notes
When the machine is not connected to the Internet through the installation procedure, skip the "Installation Repositories" screen as it will try to connect to the remote repositories otherwise.
The account created by Fedora through the installation is not in the sudoers. That means, the account has to be added to the sudoers or the root account needs to install the VMware Tools. That is a difference with Ubuntu where the first created account is in the sudoers.
Vista specific notes
If I ever need to multi-boot my machine in the future, it seems, from blog postings, that the 64-bit version of Windows Vista is getting along much better with other operating systems. I thus decided to get Windows Vista Ultimate. It comes bundled with both the 32-bit and 64-bit DVDs. It took about 10min to get Ubuntu and Fedora installed and prompting with a login screen. Vista took about 45min to get to the same point. Everything was correctly setup though and I did not have to install VMware Tools afterwards.
I followed instructions to setup sshd on cygwin. I had to first change the permissions on /etc/passwd, /etc/group and /var before sh-user-config completed correctly. The sshd daemon did not start and complained about ownership and permissions on /var/empty. To fix that, I first deleted all previously created users related to sshd as described in this post.
# Remove sshd service
cygrunsrv --remove sshd
# Delete any sshd or related users (such as cyg_server) from /etc/passwd
#   (use your favorite editor)
# Delete any sshd or relaged users (such as cyg_server) from the system
net user sshd /delete
net user cyg_server /delete
I then reran sh-user-config and all went fine. That is cyg_server ended-up owning /var/empty. I was able to start the server fine afterwards.
cygrunsrv --start sshd
I still add to open port 22 on the Windows Vista Firewall for sshd/TCP and update /etc/passwd to change my username to match the one I use on OSX. For some reason it had registered my full name as my username in /etc/passwd. Finally, I could login into the Vista machine from the OSX host.
Setup Applications
Keyboard and Screen Customization
One of the feature of OSX I appreciate is to move the mouse in a hot corner, see all windows side-by-side, and select the next active window. To enable this feature, "System Preferences > Expose & Spaces" and associate the bottom right corner to "All Windows".
I enabled fast user switching (View as Icon) and installed Spark. Then in spark, through "File > New HotKey > AppleScript", I associated ctrl-alt-del to the following Apple script:
do shell script "/System/Library/CoreServices/Menu\\ Extras/User.menu/Contents/Resources/CGSession -suspend"
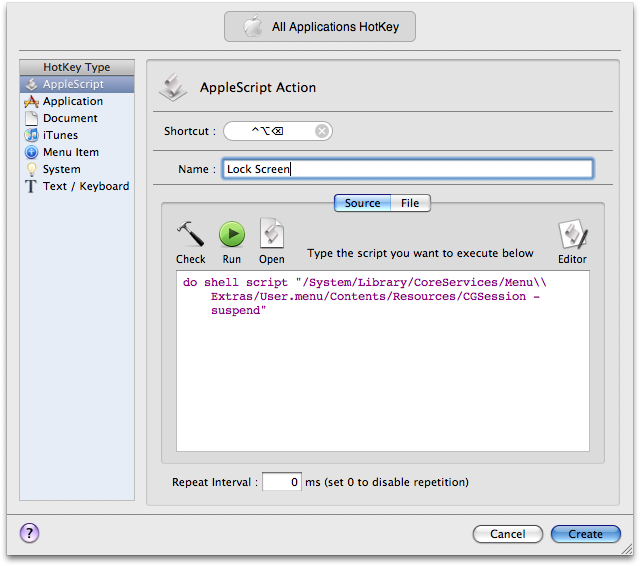
This enables me to lock the console by a quick ctrl-alt-del when I walk away for a minute.
I like the new theme concept under Terminal.app. I haven't rolled my own yet but I plan to take a look into it later on.
XCode
By default, OSX does not install the developer tools (make, gcc, ld, etc.). They come as part of the XCode 3.2 package. XCode installs both gcc-4.0 and gcc-4.2 alongside each other but links /usr/bin/gcc to gcc-4.0. In order to use gcc-4.2, I had to modify the symbolic link.
[host]$ cd /usr/bin
[host]$ ln -fs gcc-4.2 gcc
[host]$ ln -fs g++-4.2 g++
[host]$ ln -fs gcov-4.2 gcov
Updating to Java 1.6
In the same way as gcc-4.0 and gcc-4.2. Updating Java to version 1.6 won't make it the default Java Runtime. It is a little confusing at first that an update does not bump the version number. The way to change the default Java Runtime is not straightforward either.
Launch "/Applications/Utilities/Java/Java Preferences.app"
Drag Java SE 1.6 to the top of the list
Reboot the machine
Emacs
Through out the years, I've used different Integrated Development Environments. I came back from most of them and today, I use Emacs for most of my writing and coding. I personally prefer the Carbon Emacs version on OSX. I followed some of the great tricks to get the initial frame aligned on the top right corner when Emacs starts. I already have all the key bindings I really care about in my .emacs but Easymacs might be worth checking for an initial configuration.
I would like to have Emacs spell-check my documents but unfortunately the native OSX spell checker does not seem to come with a command line interface. I had to install ispell. I also installed ispell.el into /Applications/Emacs.app/Contents/Resources/site-lisp and added the following line in my .emacs
(require 'ispell)
Some website argues that the only line necessary to add to your .emacs is to point to the ispell executable. I am not sure about the difference.
(setq ispell-program-name "/usr/local/bin/aspell")
I am writing about technical subjects and the spell-checker is great but always pops up misspelled word for OSX, Mac, etc. so I added those words to my personal dictionary ~/.ispell_english, one per line. I found the file and format by typing on the command line.
[host]$ ispell -a
*OSX
#
^C
That did not work. The solution was actually much simpler. I spell checked my buffer in Emacs and type 'i' for insert on each word I wanted to add to my personal dictionary. After I exited the spell-checker mode, a question popped-up if I wanted to save my personal dictionary. I answered 'y' and the following two files were created for me: ~/.aspell.en.prepl and ~/.aspell.en.pws
Diffmerge
Diffmerge is an utility very useful to compare files and directory trees. I've added the following diffmerge script into my $PATH such that I can invoke Diffmerge.app from the command line.
#!/bin/sh
/Applications/Diffmerge.app/Contents/MacOS/DiffMerge --nosplash $* &
Graphviz
Graphviz is a collection of tools to layout and display graphs written with a .dot syntax.
GnuPG
GnuGPG is useful to sign software packages. That is a requirement in most cases to distribute them.
# create gpg key $ gpg --gen-key gpg (GnuPG/MacGPG2) 2.0.11; Copyright (C) 2009 Free Software Foundation, Inc. This is free software: you are free to change and redistribute it. There is NO WARRANTY, to the extent permitted by law. gpg: keyring `/Users/username/.gnupg/secring.gpg' created gpg: keyring `/Users/username/.gnupg/pubring.gpg' created Please select what kind of key you want: (1) DSA and Elgamal (default) (2) DSA (sign only) (5) RSA (sign only) Your selection? DSA keypair will have 1024 bits. ELG keys may be between 1024 and 4096 bits long. What keysize do you want? (2048) Requested keysize is 2048 bits Please specify how long the key should be valid. 0 = key does not expire= key expires in n days w = key expires in n weeks m = key expires in n months y = key expires in n years Key is valid for? (0) Key does not expire at all Is this correct? (y/N) y GnuPG needs to construct a user ID to identify your key. Real name: firstName lastName Email address: emailAddress Comment: You selected this USER-ID: "firstName lastName <emailAddress>" Change (N)ame, (C)omment, (E)mail or (O)kay/(Q)uit? O You need a Passphrase to protect your secret key. We need to generate a lot of random bytes. It is a good idea to perform some other action (type on the keyboard, move the mouse, utilize the disks) during the prime generation; this gives the random number generator a better chance to gain enough entropy. # sign binary package $ gpg -a -b package.tar.bz2 # verify signature of a package $ gpg --verify package.tar.bz2.asc gpg: Signature made Wed May 20 10:06:54 2009 PDT using DSA key ID XXXXXXX gpg: Good signature from "firstName lastName <emailAddress>"
OpenOffice
To edit spreadsheet, I use OpenOffice 3.1.
Communication
To browse the web, I still prefer Firefox over Safari. For instant messaging, I currently like to use Adium. I also use Skype on occassions.
I use rsync to move my Firefox bookmarks between different machines. Since that file does not end-up at the same location on each installation, I had to find the pref.js file on each user account and add a line to set the bookmark file to a fixed known location.
user_pref("browser.bookmarks.file", "/Users/username/Library/Application Support/Firefox/Profiles/bookmarks.html");
Chronicle
I definitely prefer to manage my notes through text files. Not that there are not great tools dedicated to editing blogs out there, I am just personally more productive typing my notes using the same editor I use to write code (i.e. Emacs). In order to publish those notes as a formatted blog, I've decided to give chronicle a shot. It is simple, written in perl and produces static html output of structured notes. It sounds perfect for my taste. The only dependency stated by chronicle that is not part of the pre-installed perl modules installed on OSX is HTML::Template. As it turns out, to run chronicle make test, I also had to install HTML::Lint and XML::RSSLite.
As a result, pulling through dependencies, I added, in order, the following modules into OSX perl: Pod-Coverage-0.20, Devel-Symdump-2.08, Test-Pod-1.26, Test-Pod-Coverage-1.08, HTML-Lint-2.06, XML-RSSLite-0.11, IPC-ShareLite-0.17, IPC-SharedCache-1.3 and HTML-Template-2.9, all downloaded from CPAN.
For all these modules, after extracting them, I ran the following commands.
perl Makefile.PL
make
make test
sudo make install
make test in IPC-SharedCache-1.3 failed to create share at blib/lib/IPC/SharedCache.pm (line 941) and the error reproduced when running TEST_SHARED_MEMORY=1 make test in HTML-Template-2.9. There is also a cyclic dependency between Test::Pod::Coverage, Pod::Coverage and Devel::Symdump if you try to get a clean make test on each of them before installing. Maybe I should have just forget about pulling the optional IPC modules after all.
Chronicle requires the meta-information to start at the first character of a line at the head of the file or it will interpret them as regular text. The file ~/.chroniclerc should also be edited to set the blog's title and other useful parameters.
After reading through some of the files that comes in the package, I've been able to set things as I want and chronicle works as I expected. I definitely like it.
by Sebastien Mirolo on Fri, 15 May 2009